Magic Go

How to fight a ko

You should now know what the ko rule (See Rules of Go) is but you might be wondering how you should handle a ko if it comes up.

Don’t worry if you don’t get it straight away, kos are notoriously tricky, even for dan players.

Also, I recommend you play along with this to get a good feel for it, either on your own board or a Go program.

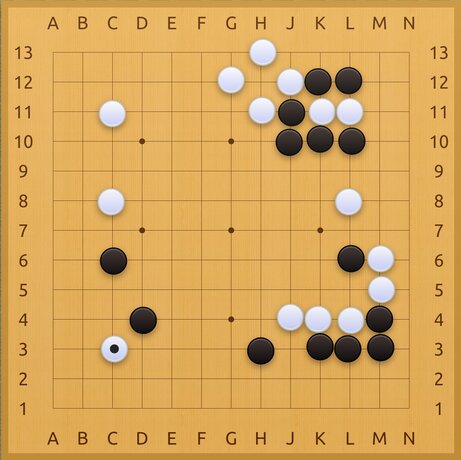
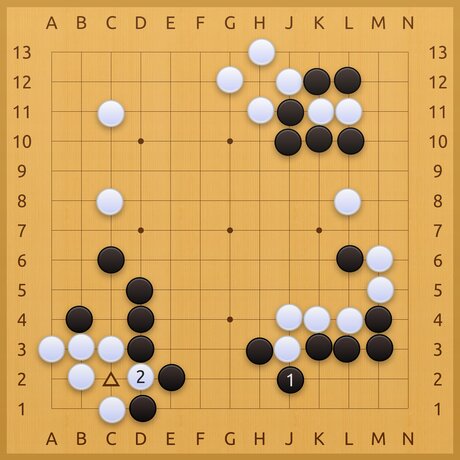
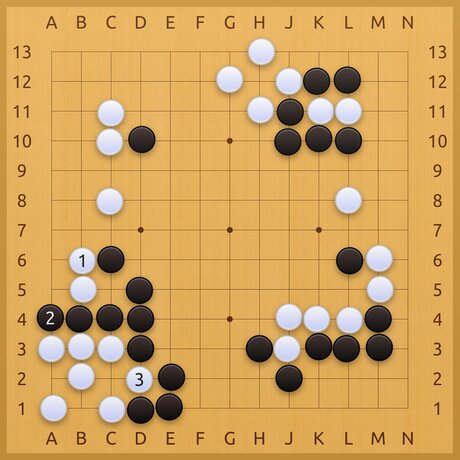
In this game, white has invaded black’s corner in the lower-left.

Usually the result of this invasion is a ko. That is, black can only kill this stone by winning the ko fight.

The corner sequence somehow came to this with black 1, putting white’s stone in atari. White needs to find a way to live.

If white simply connects the stone that was in atari, black will move in with 3.

Now white can’t make two eyes and is dead.

Instead, white should play at 2. This starts a ko fight at C2/D2.

Black takes the stone at 1.

Now, as per the ko rule, the game position cannot repeat. This means that white cannot play 2 at D2 or else the position would be exactly as it was last move.

With white being forced to play somewhere else, it seems like white has lost the group, but hope is not lost yet.

White plays a ko threat at 2.

If black really wants the bottom-left corner, they can kill it with A but then white will kill their bottom-right corner with B.

Black decides to save their bottom-right corner with 1.

Now that the position has changed, white is allowed to take the ko back with 2.

White is now threatening to take with E1, which will live in the corner.

Black can’t immediately take the stone at the triangle because that would repeat the board position, so now black is the one who needs to play a ko threat.

Black plays a ko threat at 1. White really wants to finish the ko at E1, but…

While living in the corner is great, black 3 is quite large, too.

With black 3, the left side and top-left corner is starting to become black territory.

White decides to defend at 2, which means black can retake at 3.

This is known as a ko fight. Both players will continue to make ko threats all over the board in hopes of winning the ko.

The nature of a ko fight is that if one side wins the ko, the other will get something in return (as in the previous diagram), so it is a moment of tense negotiation.

White plays a complicated ko threat at 2. This is known as a local ko threat because the threat is local to the ko fight.

If black plays 3 at B1, white plays 4 at B6.

Local ko threats are valuable because they don’t waste your aji (“potential”) elsewhere.

Black also has a local ko threat. By backing off at 1, white can only make a living shape at 2 but then black can take the ko back with 3, so the ko continues.

White plays a local ko threat at 1, threatening to play next at 2 so black blocks.

The game continues, both players focused in winning the ko. Both players eagerly play ko threats across the board.

9, 15 and 21 were played at 3.

12 and 18 were played at 6.

The ko fight continues until black plays the ko threat at 4.

Black is threatening the attack the pon-nuki to the right at H12 but white is confident that they can live if attacked there.

White believes that threat is too small and instead finishes the ko at 5.

White is now alive in the corner but not for free.

Black now turns their attention to the top-side – where their compensation lies – and launches an attack against white’s pon-nuki.

Sometimes the only way to live or get a good result is with ko. At which case players will play ko threats to attempt to win it.

Remember that your ko threats have to threaten something if they play away. It has to be something they would surely respond to. You should play the most threatening moves first.

The victor of a ko fight is decided by:

  1. The number of ko threats each side has
  2. How large/threatening those ko threats are

In this position, black didn’t have a lot of ko threats so naturally white won.